Congratulations Kimberly! You just won a Williams Sonoma 12 cup muffin pan!!

A big thanks to all that entered! Keep checking back for more exciting giveaways!!

Congratulations Kimberly! You just won a Williams Sonoma 12 cup muffin pan!!
 Now, open the can of biscuits and flatten them out. Lay them each in a muffin tin opening leaving a large dip in the center. This is where the hamburger meat will go. We love to use the Grands buttermilk can biscuits, but you can also use a regular size biscuit. We like them big and chunky!
 After they come out of the oven, sprinkle some cheese and now you have a wonderful dish. Our kids love these! Hope you try them!

 a commercial quality 12 cup muffin pan!
 Here are instuctions for creating a light tent that will help your photos look like they have a pure white background. Have you ever noticed pictures of objects that look like they are almost floating on the screen? You can achieve this by using a homemade light tent. We are certainly not photographers but just by doing a little research we've found that it can be easily done by a few materials and a little photo editing. If you need to sell an item on ebay, etsy, or any other online shop this is a great tool for you to use can inhance your pictures! Here is our version of a light tent.
Please Read All Instructions Before Beginning
 5. Now you are going to take 10 of your 2x20 sections and cut 4 inches off of each of them. Now you have 10 pieces that are 2x20 and 10 that are 2x16.
 8. Take your one large square (from #3) and one of your pieced together squares. Tape them together as shown above.
 10. You need to cut 2 inches off your poster board all the way down the longest side so it will fit inside your box. Sit your poster board in the box and tape as shown above.

 13. You can use 1 lamp or in the picture above three different lamps are used. The more lights the better. The desk lamps on the side were purchased for $5 each from Target. You will need to buy n:vision flourescent daylight bulbs and you can get them at Home Depot.
13. After a little photo editing using Gimp (a free photo editing program) with the brightness and contrast, here is the final photograph.
Good luck! Let us know when you try it or if you have already!


 After the pot is off the heat, add the 2 cups of peanut butter.
 Stir in peanut butter until it has melted.
 After the corn flakes are mixed in with the peanut butter, you can pour it onto a piece of wax paper to cool. After 10-15 minutes of cooling, roll them into balls. Or if you want the easy way out, pour the mixture into a pan to cool. Then cut them into squares.
Pinwheel Pinwheel Spinning Around. Look At My Pinwheel and See What I found.
If you were born in the late '70's early '80's, you might remember the tune to this song from Nickelodeon on a show called "Pinwheel." It was one of our favorite shows.
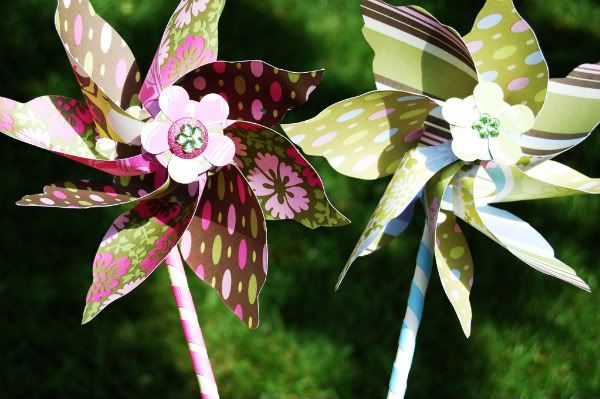 We found this precious little flower pinwheel pattern on Heather Bailey's Blog. We altered her pattern a little but go to her website for exact instructions. This would be a great activity to do at a little girl's birthday party, used for decorations, a party favor, or even gifts. Almost everything used for making these came from Hobby Lobby. Here is the supply list.
 2. Paint both the dowel and the wooden bead so they will be dry by the time you need to work with them.
 3. Print out and trace the pinwheel pattern on 2 separate pieces of your cardstock. We were excited to find Amy Butler scrapbook paper at Hobby Lobby so that's what we used.
  4. Punch a hole in the center of each pinwheel and at the end of all the spokes. (there are black dots on the pattern that you cut out to show you exactly where you need to punch the holes)
 6. Place the 2 cut out pinwheels together face up to where they are locked with spokes on top.
 7. Attach the eyelet at the center to hold them together. You can still adjust the pinwheels a little even with the eyelet in place. The eyelet pliers take a little getting use to, especially manuevering around the paper so that it doesn't tear. It's actually a pretty neat tool that scrapbookers use for decorations.
 8. Then comes the hardest part of all. This took a little time figuring out but it did finally work. You need to bring each spoke to the center, one a time, attaching them to the other eyelet. You will need to hold them down together with your fingers and try not to let your fingers shift sideways or the eyelet will not be facing up when you attach it. Now, use your pliers to set the eyelet. This is a little difficult to do but you can do it!. Both eyelets should be centered if it's done correctly. You need them to be centered so that the wire can easily go through both holes to form a straight line.
 9. By now your dowel should be dry. You can use your craft glue to attach ribbon around the dowel.
 10. Take your wire and cut about a 12" piece. Bend the wire about 3/8" from the end.
 11. Slide the hold-punched cirle onto the bent end of the wire. Then glue the other circle on top so that the bent end of the wire is no longer showing.
 12. Cut out flowers for the center or use some flower punches that are used for scrapbooking. Glue them on top of the circle and then add your button or decorative doo-dad in the center.
 13. Slide the flower pinwheel through the other end of the wire until it reaches the spindle.
  14. Add the wooden bead. Slide the wire through the hole of the wooden dowel. Leave some space between the bead and dowel so that the pinwheel will have room to spin.
 15. Finally, wrap the remaining wire around the top of the dowel tightly.
 Our passions definitely run deep. Welcome to our new blog and to our new endeavor of showcasing some of our favorite crafts for your enjoyment. We may even throw in some recipes here and there. Our hope is that we can put a smile on someone else's face that enjoys the things we do, by duplicating things we have done and that they too can share with others. Making things can be fun and rewarding. Too often people say, "I just can't do that!" We show you step by step instructions so that you too can succeed. If we can do it, you can too!
  We are truly honored by your presence here at our new blog. In honor of our little grand opening we would like to give something back to you! Target is one of our favorite places to shop so one person will be randomly selected to win a $20 Target Gift Card. The winner will be announced Wednesday morning. All you have to do is sign in at the comments section below and leave your email address.


