
Pinwheel Pinwheel Spinning Around. Look At My Pinwheel and See What I found.
If you were born in the late '70's early '80's, you might remember the tune to this song from Nickelodeon on a show called "Pinwheel." It was one of our favorite shows.
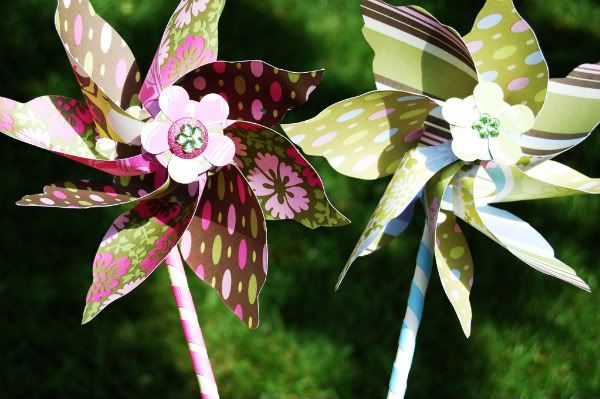 We found this precious little flower pinwheel pattern on Heather Bailey's Blog. We altered her pattern a little but go to her website for exact instructions. This would be a great activity to do at a little girl's birthday party, used for decorations, a party favor, or even gifts. Almost everything used for making these came from Hobby Lobby. Here is the supply list.
2 sheets of double-sided cardstock
some scraps of cardstock for the circles and flower cut outs
buttons or any other decorative do-dad for the center
2 1/8"-3/16" eyelets (you will also need some eyelet pliers, they usually come with a hole punch attached that you will also need)
wire, 18 gauge
wood bead 1/2"-5/8" in diameter
18"wood dowel, 5/16"-3/8" in diameter (also a drill to make hole)
paint for the dowel and wooden bead
ribbon for dowel
craft glue
flower punches
1. First thing you might want to do is drill a hole in the dowel.
 2. Paint both the dowel and the wooden bead so they will be dry by the time you need to work with them.
 3. Print out and trace the pinwheel pattern on 2 separate pieces of your cardstock. We were excited to find Amy Butler scrapbook paper at Hobby Lobby so that's what we used.
  4. Punch a hole in the center of each pinwheel and at the end of all the spokes. (there are black dots on the pattern that you cut out to show you exactly where you need to punch the holes)
5. Cut out the circle in the center of the pinwheel pattern or use a 1" circle hole punch. You will need two circles cut from the cardstock. Punch a hole at the center of one circle.
 6. Place the 2 cut out pinwheels together face up to where they are locked with spokes on top.
 7. Attach the eyelet at the center to hold them together. You can still adjust the pinwheels a little even with the eyelet in place. The eyelet pliers take a little getting use to, especially manuevering around the paper so that it doesn't tear. It's actually a pretty neat tool that scrapbookers use for decorations.
 8. Then comes the hardest part of all. This took a little time figuring out but it did finally work. You need to bring each spoke to the center, one a time, attaching them to the other eyelet. You will need to hold them down together with your fingers and try not to let your fingers shift sideways or the eyelet will not be facing up when you attach it. Now, use your pliers to set the eyelet. This is a little difficult to do but you can do it!. Both eyelets should be centered if it's done correctly. You need them to be centered so that the wire can easily go through both holes to form a straight line.
 9. By now your dowel should be dry. You can use your craft glue to attach ribbon around the dowel.
 10. Take your wire and cut about a 12" piece. Bend the wire about 3/8" from the end.
 11. Slide the hold-punched cirle onto the bent end of the wire. Then glue the other circle on top so that the bent end of the wire is no longer showing.
 12. Cut out flowers for the center or use some flower punches that are used for scrapbooking. Glue them on top of the circle and then add your button or decorative doo-dad in the center.
 13. Slide the flower pinwheel through the other end of the wire until it reaches the spindle.
  14. Add the wooden bead. Slide the wire through the hole of the wooden dowel. Leave some space between the bead and dowel so that the pinwheel will have room to spin.
 15. Finally, wrap the remaining wire around the top of the dowel tightly.
16. Your done!! Admire your hard work!

The winner for the Target Gift Card Giveaway is shown at the end of the previous post.


12 comments:
What a great tutorial! Thanks for posting it!
Wonderful project and detailed instructions!
Really cute! Change up the papers and little boys would love these too :) They're great :)
SO Cute! Thanks for the lesson.
That is adorable! I love your color combos!!!
Wondering where I can get the pattern now? It seems it's no longer available on her website. Can you post?
Great tutorial - thanks for sharing!
anonymous....I just went to Heather Bailey's website and the pattern is still there. Just click on the link below, then click to download. It should work! Best of luck to you!!
http://www.HeatherBailey.com/Pinwheel.pdf
Thanks- my computer is just too old to handle that pdf version, so I managed to get it on my work computer. Thanks- it's awesome! I actually used the pattern to make a gumpaste/fondant pinwheel as part of a cake. Same principles applied - it turned out fantastic!
where do i get pinwheel pattern?
Thanks a ton it is a good support, now to make a flower pinwheel is without a doubt simple and easy utilizing your recommendation. Thanks
Where can I get the pinwheel pattern? It is not available anymore. Thanks
Amazing are you able to make make some stuff on the demand thanks a lot
Post a Comment